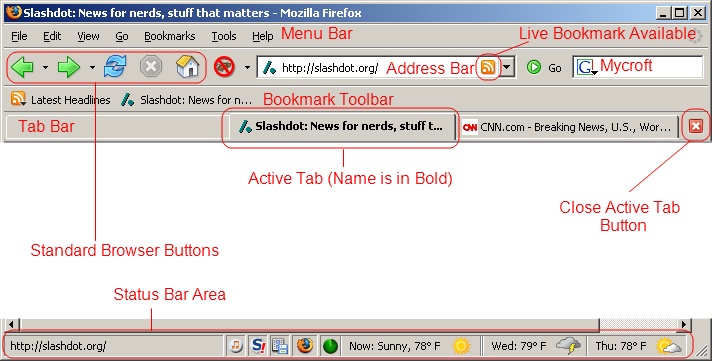
The first thing to notice about Firefox is the upper-right corner of the browser window. To the right of the familiar Address Bar, to the right of the Go button, there's a second textbox, one with a Google-branded "G" icon in it. This little area is called Mycroft (Mycroft was Sherlock Holmes' smarter brother, the guy he'd go to when he was stumped by a case), but in classes I usually refer to it as "The Searchy Thing" to distinguish it from any other search bars that may be visible on a web page.
 To use Mycroft, type something in that second text box and hit
Enter. For example, if a user wants to search Google.com for tigers, type
"tigers" (without the quotes) in the searchy thing and hit enter.
You'll be taken to a normal page of Google.com search results for the
word "tigers."
To use Mycroft, type something in that second text box and hit
Enter. For example, if a user wants to search Google.com for tigers, type
"tigers" (without the quotes) in the searchy thing and hit enter.
You'll be taken to a normal page of Google.com search results for the
word "tigers."
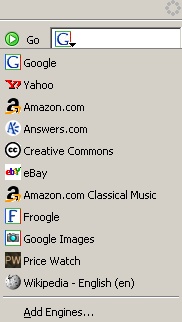
Mycroft does not have to search Google.com. If you click the "G" icon
within Mycroft, you'll find that it's a dropdown that supports several
other popular web sites such as Amazon.com and Ebay.com. You can select
from any of the available search sites in the drop down as easily as
clicking on them. You can therefore run your search for "tigers" on
Ebay or Amazon.
As if that's not enough, you can add other sites to your personal drop-down. At the buttom of the list of available searches, there's an option to Add Engines, which takes you to a page where there are 20 more popular sites for searching. Personally, I'm quite fond of adding Wikipedia.com, an online encyclopedia, to my Mycroft drop-down. If I click the Wikipedia link on the Search Engines page, I'm prompted with a box that says "Add the following Search Engine to your Search Bar?" If I say yes, then click on my Mycroft drop-down again, I can see that Wikipedia is now at the bottom of my list of search options. Very handy.
For a lot of web users, Google.com may be the limit of searching needs. But Mycroft doesn't stop there. It turns out that the page with those 20 "extra" search services are just 20 out of around 8,000 available search plug-ins for Mycroft. At the bottom of the Search Engines page there's an option to Browse through more search engines at mycroft.mozdev.org. In the middle of the page there is a text box with the label "Find Sites" above it. Type the name of a site you search regularly and click the Search button. With any luck, there will already be a search plug-in for your favorite site.
For example, if I want to add Google Image search to my Mycroft dropdown, I might type "Google Images" in the Find Sites text box. After I click the Search button, I find over a dozen different results, one for the English-language "Google Images" site, and others for various country-specific versions. Clicking the name of the site brings up the prompt to add that site to the list of available searches. Ta-Da!
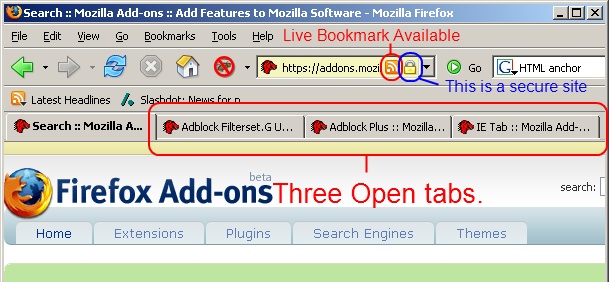
Browser innovation #2: Tabs in your browser. Someone used to Internet Explorer is also used to having 14 open IE Windows. It's just part of normal browsing, right? Turns out it doesn't have to be. Firefox offers the option of opening more than one web site at a time in a single browser window. How does it work?
Find a Link to something. A link that might normally be clicked on (usually they're underlined in blue). Instead of clicking on that link as normal, use the scroll wheel on the mouse like a button. Click. If all goes well, there is a new bar along the top of the screen with a couple of hanging-folder-style tabs on it. tabs can be switched as easily as clicking on them. On the same bar with the tabs, there's a tiny red X to close the active tab.
Someone without a scroll wheel can accomplish the same thing by right clicking on a link and choosing Open Link in New Tab from the context menu.
Users can open as many tabs as they like, even make so many that they scroll off the screen. Most people probably wouldn't do that, but it is possible. Tabs can also be re-ordered by dragging and dropping them along the Tab Bar.
Once you get used to the idea of having tabs, multiple open windows will probably become something of an annoyance and possibly even a little confusing. To ensure that everything stays in just one browser window, it is necessary to fiddle with Firefox's Options a little bit.
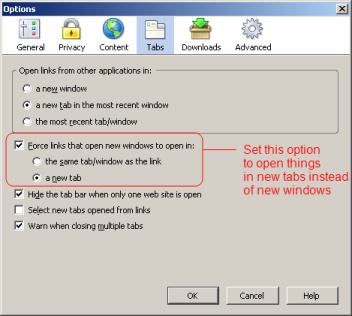
Once you've set that option, the only time you should see more than one Firefox window is when you deliberately open one (which you can do from the File menu at the top of the screen).
Another feature of Firefox is support for Live Bookmarks,
which are also called RSS Feeds. Basically, if a web site supports RSS,
it a small orange and white button  appears on the right-hand sid of the
address bar. Clicking this button offers the user the option of
"subscribing" to that Feed (some sites even offer more than one). If a
user later clicks on the that feed, s/he sees an overview of recent
changes or headlines on that site.
appears on the right-hand sid of the
address bar. Clicking this button offers the user the option of
"subscribing" to that Feed (some sites even offer more than one). If a
user later clicks on the that feed, s/he sees an overview of recent
changes or headlines on that site.

For example, go to NPR.org. Click the orange button on the right side of the address bar. You'll be asked where you wish to add your Live Bookmark, which the default location being the Bookmarks Toolbar Folder.
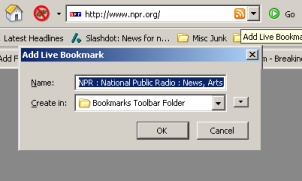
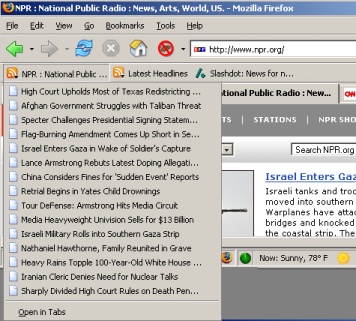
You'll find that you now have a new "NPR: National Public Radio" button on the bar immediately beneath the address bar, one with the orange and white Live Bookmark icon. If you happen to click on this NPR button, you'll be treated to a menu listing all the current top stories on the National Public Radio web site.
RSS Feeds have been around for years, but since Internet Explorer does not support them, the overwhelming majority of Internet Users have never heard of them. RSS works extremely well, even for users on slow connections to the internet. Users who regularly check their subscribed feeds are users who are not continually reloading the pages they visit most frequently.
Firefox was created to be nothing more than a simple web browser. It was not made to have dubious additional functionality, features that most people would not use. At the same time, the folks who volunteer their time to improve the Firefox browser sometimes have good ideas for small tools that might enhance a web surfer's experience. For this reason, Firefox supports Extensions, a series of wholly optional add-ons that add new functionality to Firefox.
To get to the main extensions web site:
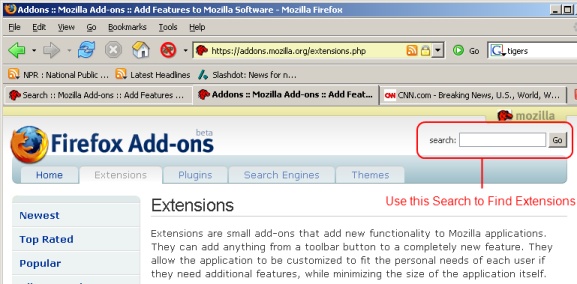
There are lots of extensions available. Hundreds, easily. Many of them will be useless to almost everyone, but a few real gems are important for basically anyone who browses the web. To find a particular extension, use the search feature on the Firefox AddOns page rather than Mycroft. The Addons search is not as accurate as Google.com; sometimes a user can type the exact name of an extension and still have to wade through a page of search results or more to find what s/he is looking for.
Without a doubt the most important Firefox extensions are the matched pair Adblock Plus and Adblock Filterset.G Updater. Those two extensions will be the foundation this tutorial. To begin, search (once again, on the Extensions page, not with Mycroft) for the word "Adblock." There will be many search results. This is normal. Go ahead and open the "Filterset.G" and "Adblock Plus" links each in their own tab (by middle-clicking on the links, remember?). Normally these two extensions are the first two search results.
Are there three tabs open at the moment? One for each of the suggested extensions and the original tab used to search? If there are, let's move on to another important and useful extension. Search for "IETab", without the quotes. Again, there shoud be multiple search results. Open the one that's actually "IE Tab" in a tab of its own.
To install an Extension, simply click the Install Now text on each page with an Extension installer on it. One who has been following along with this document should have three such pages open in tabs at this point. The user will be prompted with a window displaying some basic information about the extension, such as its name and where what internet site it's being installed from. The user may notice that the OK button normally used to start the install is momentarily greyed out; Firefox makes users wait five seconds to read the information on the screen. This is a security feature. After all, extensions are software that changes how Firefox works! As it turns out, there are only two sites on the whole internet that are even allowed to install Extensions through Firefox by default. If an extension isn't found on one of those sites, installing something is a much more bothersome proposition.
At any rate, install the three Extensions. Close the Extensions window or not, depending on preference. It will come back every time an extension is installed, anyway. Once the Extensions are installed, close every open Firefox window, including the Extensions and/or Downloads windows if they are open. Firefox must be restarted before the Extensions do anything..
Upon re-start you'll be greeted with some legal boilerplate that comes from Adblock Filterset.G Updater. It basically says that, if Adblock and the Updater are both installed, you'll be missing certain elements from web pages and to not complain if you can't see something you're supposed to see. Again, this is normal and will only happen the first time you start Firefox after installing those particular extensions. Now, let's take a moment to discuss what the three extensions I've recommended thusfar actually do:
Adblock Plus: The original version of Adblock was created to give web users tha ability to selectively block or remove content from web pages. Originally, this meant right-clicking on a particular part of a web page (usually an image, but other things can also be blocked) and choosing "Adblock" from the context menu. Obviously, the original function was to remove advertising from web pages, but there were two problems. 1. Some "good" advertising content might be blocked inadvertently (for example, the text ads on google.com), and 2. Many, many users of Adblock all wanted to remove all of the same stuff, so lots of work was being duplicated.
Adblock Plus fixes problem #1 by allowing a "White List" of explicitly allowed ads for web sites, making it more compatible with popular Internet services like Gmail and Google Calendar.
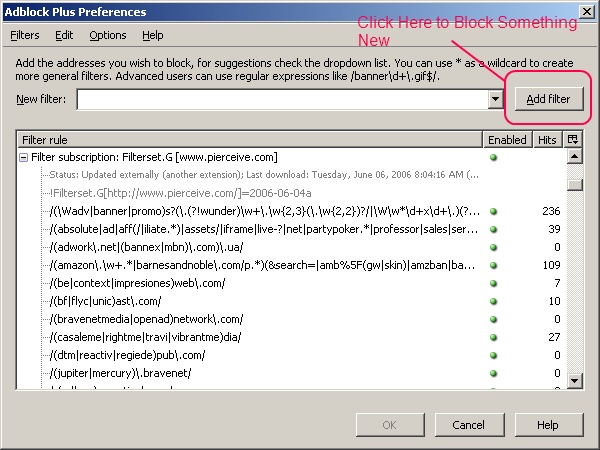
To Manually remove an image from a web page with Adblock Plus: Right click on the image. Click Adblock Image (or Adblock iFrame, if that option is available). The Adblock Plus configuration window will open. Click the Add Filter button. Poof. The image goes away forever.
Adblock Plus can also be temporarily disabled. Go to the Tools menu, then Adblock Plus. In the Adblock Plus configuration window, choose the Options Menu and click Enable Adblock Plus. The same procedure re-enables adblocking.
Adblock Filterset.G Updater: The Filterset Updater solves the problem of duplicating the effort of finding things to block with Adblock. A very nice group of people continuously add to a list of internet sites that are used to dish out advertising and other obnoxious content. Approximately once a week, they release a new list in a format compatible with Adblock's filter. The Filterset Updater monitors the site where new filters are posted and updates the list on your computer automatically.
Note that many for-profit web sites can only exist because of advertising. Some web companies even take the position that not looking at their banner ads is the moral equivalent of stealing. Other sites bury content or features so that they cannot be viewed without viewing ads (which are blocked by Adblock). The ramifications of these things are left to the reader.
IE Tab: Some web sites haven't gotten the hint yet. Some web sites never will get the hint. In any case, there are places one can go online where Firefox is not usable. Microsoft.com, for example, looks and behaves completely differently for Internet Explorer than it does for non-Microsoft web browsers. In other cases, a site might depend on an Internet Explorer-only technology called ActiveX to properly display.
As anyone familiar with computer technology can attest, long-term use of Internet Explorer is inherently problematic; there are just too many security issues with the most common Internet Browser. So what does one do when confronted with an IE-only web site?
One option is to copy and paste the URL from Firefox's Address Bar to Internet Explorer's. That's kind of clunky, and may even be beyond some computer users (e.g. little kids, grandmothers, AOL Users). Those same users are also people who probably won't notice that they're not using safe and secure Firefox any more. So that may not be the best idea.
Another option is the IE Tab extension. IE Tab places a tiny Firefox icon along the bottom right status bar in the Firefox window - the same bar that shows page loading progress. With IE Tab installed, (left) clicking on that button switches that single tab being viewed to display in Internet Explorer. In "IE Mode", the little Firefox icon changes to a blue E, as does the tab icon and the icon in the address bar. Furthermore, the navigation buttons take on Internet Explorer-like forms. Navigate off that web site, and IE Tab switches you back to the safety of Firefox.
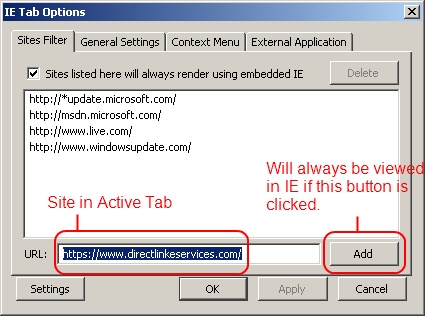
 If there's a page that absolutely won't function properly without
Internet Explorer, you can also mark it to permanently IE-only by
right-clicking the little Firefox (or IE) icon along the bottom status
bar. This brings up the IE Tab configuration window. To add the site
presently displayed in the active Firefox tab, simply click the Add button.
If there's a page that absolutely won't function properly without
Internet Explorer, you can also mark it to permanently IE-only by
right-clicking the little Firefox (or IE) icon along the bottom status
bar. This brings up the IE Tab configuration window. To add the site
presently displayed in the active Firefox tab, simply click the Add button.
A few more extensions worthy of your time. These can each be found from the obvious one-word search on the Extensions Web Site.
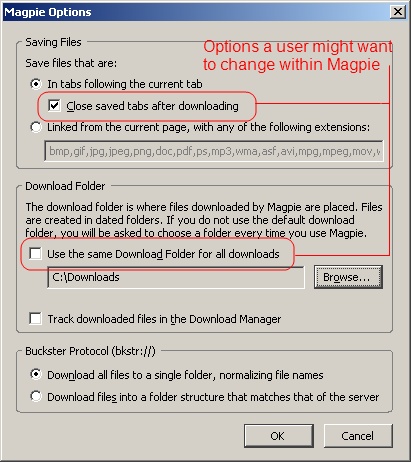
* Magpie is a special case, since the proper place to find it is not on the Firefox Extensions site.
Foxytunes: Foxytunes adds controls for your media player of choice to the status bar at the bottom of the Firefox Window. With Foxytunes installed, a user can load, play and pause their music playing application directly from their web browser. Very handy when the phone is ringing, if nothing else!
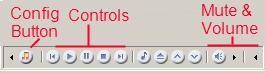
To use FoxyTunes, a user music first click the red "Quarter Note" icon on the FoxyTunes control bar, then choose Player
from the menu and then the music player s/he prefers to use (e.g.
Windows Media Player, WinAmp, iTunes et al.). With a player selected,
all the buttons
in FoxyTunes become active, and a user can fully
control his or her chosen program.
To fully configure CustomizeGoogle, go to Firefox's Tools menu, then Extensions. Select CustomizeGoogle on the list of extensions (assuming you have it installed) and click the Options button.
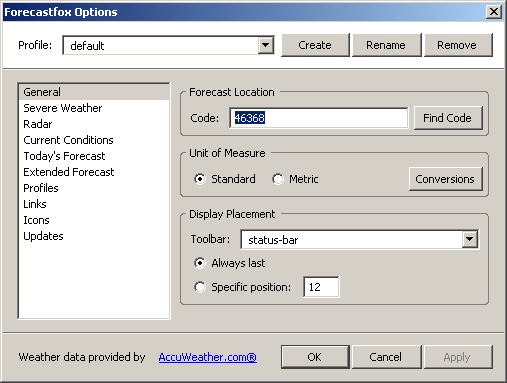 ForecastFox:
ForecastFox is another extension that adds its controls to the
statusbar at the bottom of the Firefox window. The first time
Forecastfox is activated with your Firefox install, it asks for your
"Code", which in the USA means your ZIP Code. Type your ZIP
code in the yellow box on the ForecastFox configuration screen and
click OK. After that, you should notice four small tray areas are added
along the bottom of your screen.
ForecastFox:
ForecastFox is another extension that adds its controls to the
statusbar at the bottom of the Firefox window. The first time
Forecastfox is activated with your Firefox install, it asks for your
"Code", which in the USA means your ZIP Code. Type your ZIP
code in the yellow box on the ForecastFox configuration screen and
click OK. After that, you should notice four small tray areas are added
along the bottom of your screen.
The first of them from the left is a green picture of a radar screen. Holding your mouse pointer over that tray shows a small weathermap of the area you've configured ForecastFox to monitor. The second is the current weather conditions; holding your mouse point on that or any of the other tray icons will display a tooltip with more information about the weather. The third button is the forecast for the rest of the day. The fourth is tomorrow's forecast.

Clicking on any of the ForecastFox tray icons sends the user to a pages at Accuweather.com with more complete information. ForecastFox was written by the people who run Accuweather.com; it doesn't support any other weather services. Information in ForecastFox updates every half hour by default. ForecastFox Enhanced simply displays more information in its trays than the regular version of ForecastFox. It also displays a much larger radar image.
Linky:
Linky is a tool that probably wouldn't make a whole lot of sense to
have until a user is used to the idea of having Tabs. Simply put, Linky
allows a user to select ("highlight", "click and drag") a whole bunch
of links and open them all at once.
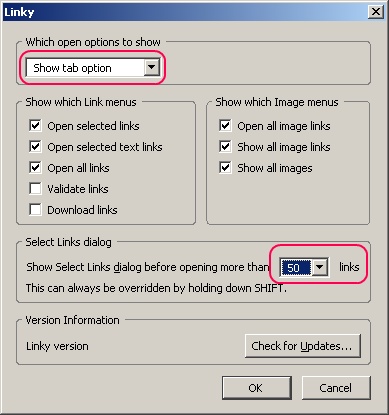
Just highlight a bunch of stuff on a web page, right click on something in the selected area, choose Linky from the context menu, then Open Selected Links in Tabs. Or, right click on a web page, choose Linky and then Open All Links in Tabs. Or, right click, choose Linky, then Open All Image Links in Tabs. Lots of options, but the result is the same: lots and lots of stuff in tabs. This is amazingly helpful on photo gallery sites like Flickr.com, news web sites with lots of interesting stories or forum web sites with lots of new topics.
Linky does need a small amount of tuning to behave in the best possible manner. First, it likes to get a confirmation before it starts loading links. That's a whole extra click! Boo! Second, it displays options to open things in Tabs and to open things in new Windows. This makes the Linky context menu much longer than it needs to be and clogged with sub-optimal options. Boo!
To fix both problems, go to Firefox's Tools menu, then Extensions. Select Linky on the list of extensions (assuming it's installed) and click the Options button. In the Select Which open options to show drop-down box, choose Show tab option. Under Select Links Dialog, choose some higher number than 0. Linky will never open more than 99 links at a time.
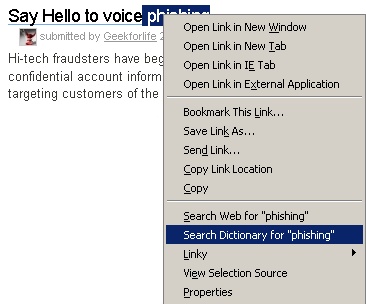
DictionarySearch: With dictionarysearch installed, a new context (right-click) menu option is available. Highlight a word. Right click on it. There will be an option to Search Dictionary for [word]. A new tab will open from a dictionary web site. This is very handy for quick spell checks as well as unfamiliar words.
Noscript: A very large percentage of web sites use tiny computer programs called scripts to add extra functionality to web pages. Some web pages may also use an entirely separate programming system called Java to add extremely complex programs that run directly through a web browser. For the most part, scripts (usually written in a language called javascript, which has nothing at all to do with actual java, other than the name) do harmless tasks like moving a cursor around to different fields on a form, or scrolling between two images in a banner ad. Full-blown Java programs are usually used for complex animations, games or useful programs like anti-virus scanners that run through a web browser. Both scripts and Java, however, can be used for less wholesome work; it's possible to write a virus in Java, and javascript can and is frequently used to generate pop-ups and disable user interface elements (such as the navigation buttons) in a web browser.
Most internet users have at least seen the terms "Java" and "Javascript", but have no idea what they actually mean, let alone what the two technologies actually do and as a result can suffer when they visit the occasional web site with annoying or dangerous scripts. Experienced, technical users often turn Java and Javascript off completely in their web browsers just to be safe; something that requires a great deal of dgging through pages of options , but this frequently creates an annoying condition where, in order to use a particular web site, Java/Javascript have to be turned back on.
The ideal would be to have a button to toggle Java and Javascript on and off when it's needed... and that's exactly what Noscript does. By default, with Noscript installed, all the little extra programs a web page may use are turned off. Should the user run across a page that doesn't display or appear to work properly, they can turn scripts on just for that one site, or add the site to a "white list" of sites where scripts are always OK.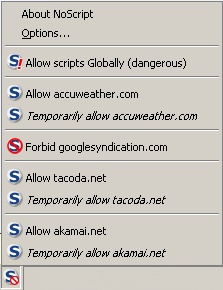
Videodownloader: Lots of web sites these days have video content embedded. YouTube, Google Video, even news sites like CNN.com. Sometimes it's less than obvious how to save the videos, and sometimes, even if the video can be saved, it's in a format that can't be played back except through a web browser. Videodownloader exists to allow its users to download video, and if necessary, to advise users on the tools needed to play that video back at a later time. To use Videodownloader, simply visit a web page where video plays as part of the normal content on the site and click on its statusbar icon. Videodownloader's sub-window will identify the video that's playing and provide a direct link to download that file. It may offer downloads in multiple formats or provide a link to a player application for particularly unusual videos.
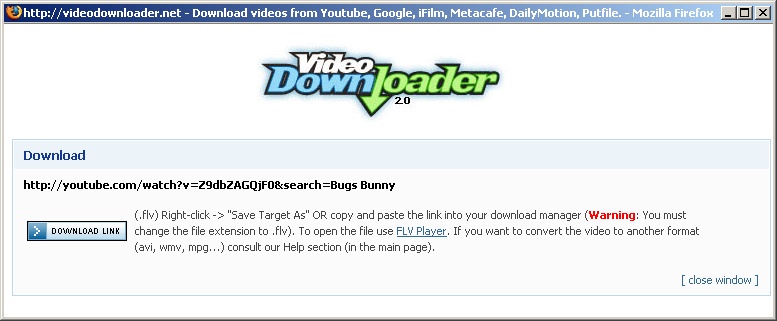
Videodownloader has no options, and cannot download videos that launch in a separate window or for streaming "live" video.
Fasterfox: Fasterfox, once installed, tweaks a number of network connection settings within Firefox, based on the assumption that the user has a high-speed connection to the internet. Most web pages load somewhat faster when Fasterfox is installed. Fasterfox doesn't particularly help dialup users, and it has a reputation for being slightly buggy as well. There really aren't any settings to configure with Fasterfox.
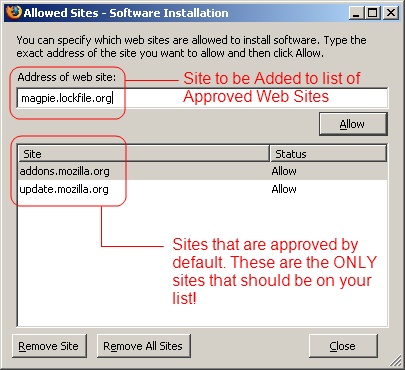
Magpie: The original version of Magpie was written by Ben Goodger, the gentleman who manages the Firefox Project. It allows a user to save multiple tabs' worth of data all in one shot. Mr. Goodger hasn't had time to update the official version of his extension in quite a while, and the now-dated old version doesn't work with new versions of Firefox. Fortunately, someone else has taken the time to make the slight modifications needed so that Magpie can function with up to date versions of everyone's favorite browser. The problem is, the person who is now doing the work isn't Mr. Goodger, and doesn't have the right to put his up-to-date copy of Magpie on the Firefox Extensions web site.
Rather than claim credit for someone else's work, the programmer in question posts his version of Magpie on his own web site, and regularly leaves a comment on the official Magpie download page indicating where his version can be found.
The important thing here is not the function of the extension, but to describe a security feature of Firefox. Firefox only allows extensions to be installed from two web sites. The site hosting the updated Magpie extension isn't one of them. Therefore, to install Magpie, it must be added to the list of sites allowed to install extensions.

To Install Magpie (or some other non-Approved Extension):